When it comes to fruit canning, choosing the best fruits is crucial for achieving delicious results. Whether you are a seasoned canner or a beginner looking to preserve your homegrown produce, selecting the right fruits can make all the difference in the final product. Here are some tips to help you choose the best fruits for canning.
First and foremost, choose fruits that are ripe but firm. Overripe fruits can turn mushy during the canning process, affecting both the texture and flavor of the final product. Opt for fruits that are just ripe or slightly underripe for the best results. Additionally, try to use fruits that are in season, as they will be at their peak flavor and freshness.
Some of the best fruits for canning include berries such as strawberries, blueberries, and raspberries, as well as stone fruits like peaches, plums, and cherries. These fruits hold up well during the canning process and maintain their shape and flavor. Apples and pears are also excellent choices for canning, as they are versatile fruits that can be used in a variety of recipes.
When selecting fruits for canning, make sure to wash them thoroughly and remove any stems, pits, or seeds. Cut the fruits into uniform pieces to ensure even cooking and canning. And don't forget to follow a trusted canning recipe to ensure safe and successful results. With a little bit of planning and preparation, you can enjoy delicious home-canned fruits all year round.
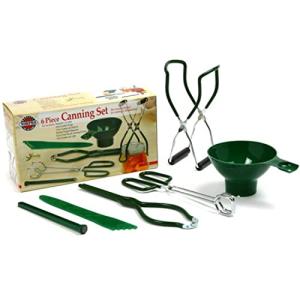
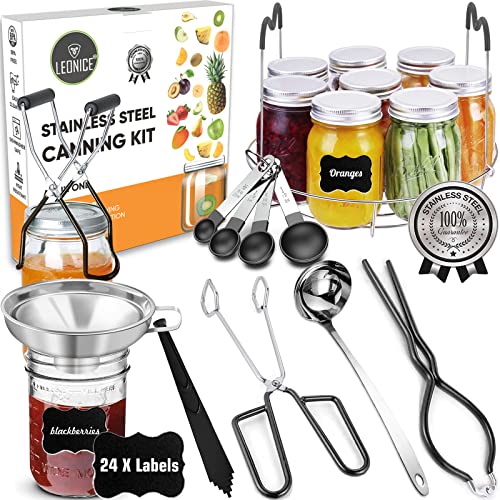
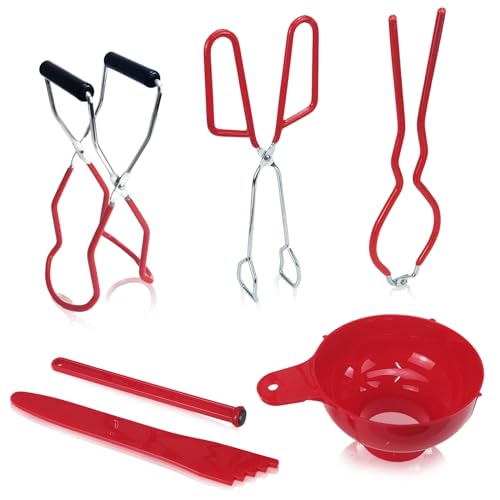
Essential Tools and Supplies for Fruit Canning
Whether you're a seasoned canner or just starting out, having the right tools and supplies is essential for successful fruit canning. Here are some must-have items to have on hand before you start preserving your delicious produce.
First and foremost, you'll need a large canning pot with a rack to hold your jars. This pot is essential for safely processing your canned fruit and ensuring they stay preserved for the long term. Look for a pot that is big enough to hold your jars with at least an inch of water covering them during processing.
Another important tool is a set of canning jars and lids. Make sure you have enough jars on hand to accommodate the amount of fruit you'll be canning. It's also important to use new lids each time you can to ensure a proper seal.
In addition to jars and a canning pot, you'll need a few basic tools such as a jar lifter, a wide-mouth funnel, and a bubble remover. These tools will make the canning process much easier and help you fill your jars more efficiently. Don't forget to also have labels and markers on hand to properly label your canned fruit before storing them.
Step-by-Step Guide to Canning Your Produce
1. Choose your produce wisely: Start by selecting the freshest and ripest fruits from your garden or local farmers market. Make sure to wash and clean them thoroughly before starting the canning process.
2. Gather your supplies: You will need canning jars, lids, bands, a large pot for boiling water, a jar lifter, a canning funnel, and a clean kitchen towel. Make sure your jars are sterilized before use.
3. Prepare your fruit: Peel, pit, and chop your fruit as needed. You can also choose to leave some fruits whole or halved, depending on your preference. Add any necessary sugars, spices, or liquids according to your chosen recipe.
4. Fill the jars: Using a canning funnel, carefully fill your sterilized jars with the prepared fruit, leaving some headspace at the top of the jar. Wipe the rims of the jar with a clean kitchen towel to ensure a proper seal.
5. Process the jars: Place the filled jars in a large pot of boiling water, making sure they are fully submerged. Let them process for the recommended amount of time according to your recipe. Once done, use a jar lifter to carefully remove the jars from the water and let them cool on a clean towel. Enjoy your delicious canned fruits for months to come!
Storing and Enjoying Your Homemade Fruit Preserves
One of the most rewarding parts of fruit canning is being able to store and enjoy your homemade fruit preserves long after the growing season has ended. Proper storage is key to ensuring that your hard work in the kitchen pays off in the form of delicious, flavorful preserves all year round.
When it comes to storing your homemade fruit preserves, it's important to first make sure that your jars are properly sealed. After removing them from the hot water bath canner, check each jar for a secure lid seal by pressing down on the center of the lid. If the lid springs back, the jar is not sealed properly. You can either reprocess the jar or store it in the refrigerator for immediate use.
Once your jars are properly sealed, store them in a cool, dark place away from direct sunlight. The ideal storage temperature for homemade fruit preserves is between 50 and 70 degrees Fahrenheit. A pantry or basement shelf works well for this purpose. To ensure that your preserves remain safe to eat, it's important to properly label each jar with the type of fruit and the date it was canned.
When you're ready to enjoy your homemade fruit preserves, simply open a jar and savor the flavors of summer all year round. Whether you spread them on toast, swirl them into yogurt, or drizzle them over ice cream, your homemade preserves are sure to add a delicious burst of flavor to any meal. So take the time to store your fruit preserves properly and enjoy the fruits of your labor for months to come.